The hammer is one of the most complex and procedural airplanes ever made on paper. It’s equally among the toughest, smallest, and fastest paper planes. The weighted tip gives the plane more thrust and ensures it can fly faster and farther when thrown harder. I know by now you have started liking this fighter plane and you can learn the ropes to make an incredibly fast and tough hammer plane. However, just relax and be cool. I won’t charge you anything to give you the basic tips for creating a working plane from paper.
In this step-by-step guide, you will learn how to make a paper airplane easy fast cool like a pro. Stay with me and watch as the mystery, of what seemed impossible to many, unfolds right before your eyes. In the end, you will not only know how to create a cool and fast paper plane but also have created an awesome ready-to-fly airplane.
There are tons of videos online that are intended to make the process of making a hammer paper airplane. Check out this video to have an idea of how to go about the process of making quality and cool hammer paper plane. You can also watch through this tutorial to understand the basics of creating the perfect airplane that can fly. If you are like me and would rather follow a written tutorial, here I am going to outline practical and easy tips you can follow to create your next hammer airplane. Let’s have a look at these tips and how to go about the hammer plane making process. The only supplies you need to be able to create this airplane are a paper and 30-centimeter ruler if possible.
Make the First Fold
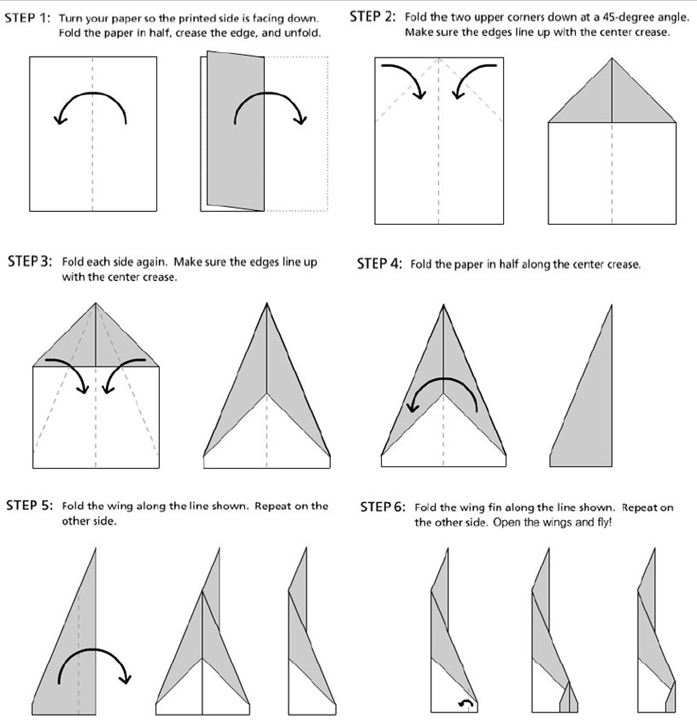
Get the right sheet of paper. Professionals recommend a printer paper as it’s stiffer and has great folding properties. It’s also hard and strong. Make a diagonal crease by taking the paper’s top left corner and folding it towards the right side of the paper. The fold should leave almost a quarter of the sheet at the bottom intact and the two edges aligned. Unfold the fold you already made. Do exactly the same with the other corner of the paper sheet.
Make The Second Fold
The folds you made in the first step will leave the sheet to have a big X sign. Now, fold the top right corner such that the fold’s edge is positioned on the crease you made in the first step. Create a similar fold at the top left corner. Make sure the folds are accurate. The awesomeness and performance of the end product will depend on the accuracy of these creases.
The Next Folding Steps
Take the sides and fold them halfway and vertically. Unfurl the crease you just made. Then, take the upper paper end and fold it down such that it is aligned with the lower end. Now, get the outer paper edges and fold them towards the center leaving the points touching each other. Unfurl the crease made. Take the top edge you earlier folded down and fold it up so that the paper edge and the creases of the previous step meet. Now, crease the protruding flaps halfway following the inner crease.

The 4th Great Step
If you have read up to this point, you certainly have done so because you want to know how to make the best paper airplane. If not, you won’t have wasted your time reading up to this point. As for me, I won’t disappoint, because I am here to help you create a fast and cool paper airplane that can win you awards. To cut a long story short, the next step is to take the protruding flaps aligned on the crease made on the above steps. The resulting product ought to be an almost ready airplane symbolized by straight edges on the lower paper sides. Once you’re done, you have to then crease the paper point downwards. Make sure you flip the whole airplane over. You have to fold it halfway. Next, fold the wings downwards in such a way that the edge is left seated on the lower corners of the plane. Now, flip over the folds. Make sure you fold the other wing such that it falls at the right side of the first wing. You must ensure the wings are at least 90 degrees to the airplane body.
The Final Step
When you are done with the above step, you will have already succeeded in creating a ready-to-fly airplane that could fly as far as you push it. The only remaining work will be to finish it so as to give it a shape and make it ready to fly. Now, you have to unfold your plane’s wings such that the entire plane creates a V shape. Once you are done with the above step, you will be ready to go. Just find a spacious area outwards and make sure you throw your already made plane the hardest possible and watch it as it flies the farthest possible. With these steps, you can create as many hammer paper planes as you want.
Conclusion
With the above guide on how to make a paper airplane easy fast cool, we have learned the fundamentals of making an award-winning paper plane that flies fast. Each of the steps mentioned above is crucial so you must be extra careful. Make sure you follow each of these steps to the latter. You may have to make a trial plane to see how it comes out like. After making the trial plane, you may then go ahead to make a ready-to-fly plane. It’s crucial to remember that these steps are only ideal when you want to make a hammer paper plane. If you are enthusiastic about making a hammer plane, it’s time you took advantage of the tips we have outlined up there.


